Software instances
In the Software Instances dashboard, configure myViewBoard Whiteboard settings for users in your entity. This is a convenient way for admin to ensure the application across devices all meet the school's requirements.
What is a software instance?
A software instance is any installation of myViewBoard Whiteboard (for Windows, Android, and iOS versions) that can be configured with specific settings by IT admin. If the Whiteboard software is deleted and reinstalled, it will count as a separate instance as it requires enrollment as an instance again (requiring a new name and ID).
How to enroll software instances
If instances of the Windows version of Whiteboard are installed using MSI Command Prompt or Group Policy (or similar), and the organization is correctly entered to match that of your entity, enrollment is automatic and no other manual action is required.
For entities who use the Android version of Whiteboard on ViewBoards, enrollment is automatically completed by adding devices to Manager.
Users who installed the Android or iOS version of Whiteboard onto their device can enroll the software instance of Whiteboard after opening it and viewing Settings > 
Methods of enrolling (Android and iOS versions)
Add devices to Manager (IFP Android-only)
This method is only possible on the Android version of Whiteboard installed on ViewBoard IFPs. By adding a ViewBoard device to Manager, the instance of Whiteboard installed on the IFP will automatically be enrolled the next time Whiteboard is launched.
Please note, the first time you launch Whiteboard, you may see the option to enroll your Whiteboard with a form or QR code (see below methods). Restart Whiteboard to see automatic enrollment take effect.
DeleteWhiteboard Enrollment Form (Android and iOS)
- Install Whiteboard onto the device.
- Open the software and sign in with your myViewBoard account.
- Press
to open settings.
- Press
for the software information tab
- Press Enroll Software Instance under Entity.
- The following are required to complete the Whiteboard Enrollment Form:
- Whiteboard name
- myViewBoard email address
- After inputting the email address, await detection of the corresponding entity.
- A prompt should appear informing you of successful enrollment.
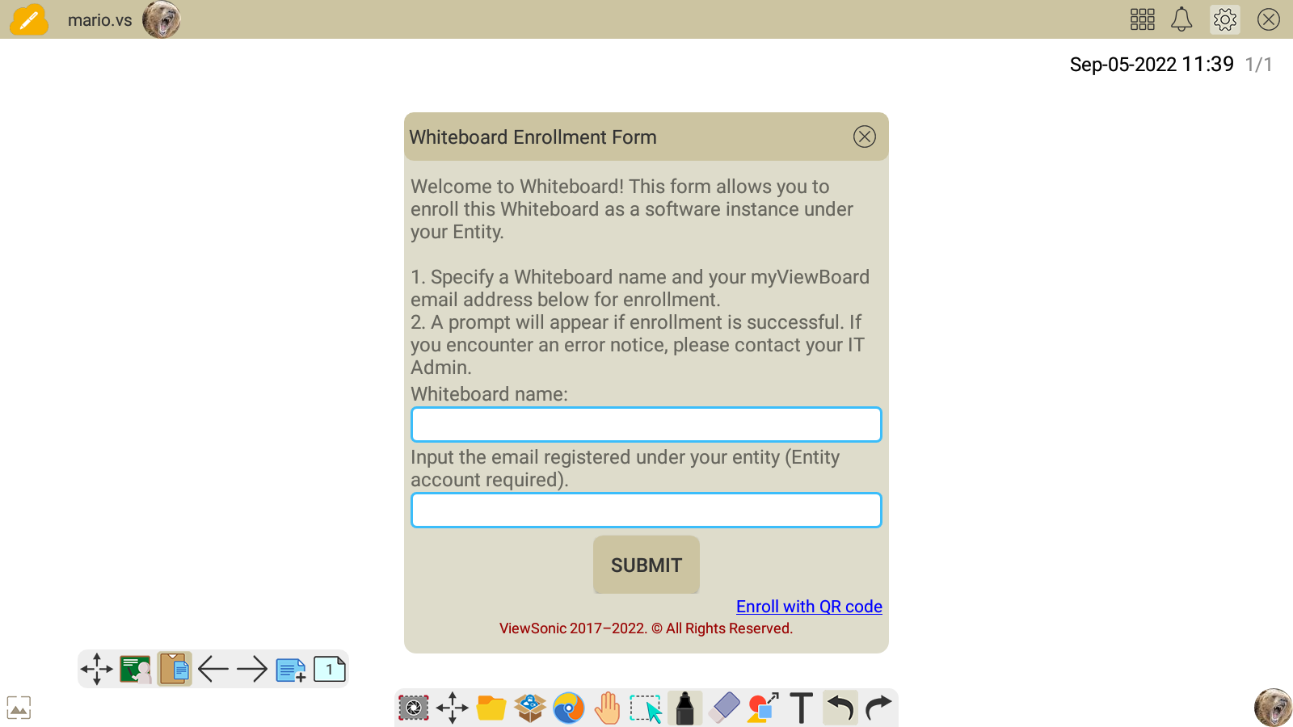 An instance name and a valid myViewBoard entity account are required to complete the enrollment form.
Whiteboard Enrollment via QR Code (Android and iOS)
This method requires myViewBoard Companion app. To learn the process, view the Companion app Whiteboard enrollment page.
DeleteActivator APK (Android-only)
For non-ViewBoard Android devices, such as Chromebooks, users can enroll Whiteboard through the above form or QR code methods.
Additionally, if users prefer to make enrollment automatic on affected devices, an Activator APK is required.
You must request an entity-specific Activator APK from your local sales representative or from our support team.
Once received, install the APK onto your desired devices. After doing so, the next time Whiteboard is launched on those devices, those instances will automatically be enrolled to your entity.
DeleteMSI file installation (Windows version)
Whiteboard for Windows is installed from an MSI file. For the purposes of enrollment, Whiteboard can be installed through command prompt.
To learn more, view the MSI file installation page.
Access the Software Instances console
After enrolling your desired instances, they will be viewable in the Software Instances console.
- Sign in to myviewboard.com with your entity admin account.
- Open Entity Management.
- On the left-side menu, enter Software Instances.
Software Instances console overview
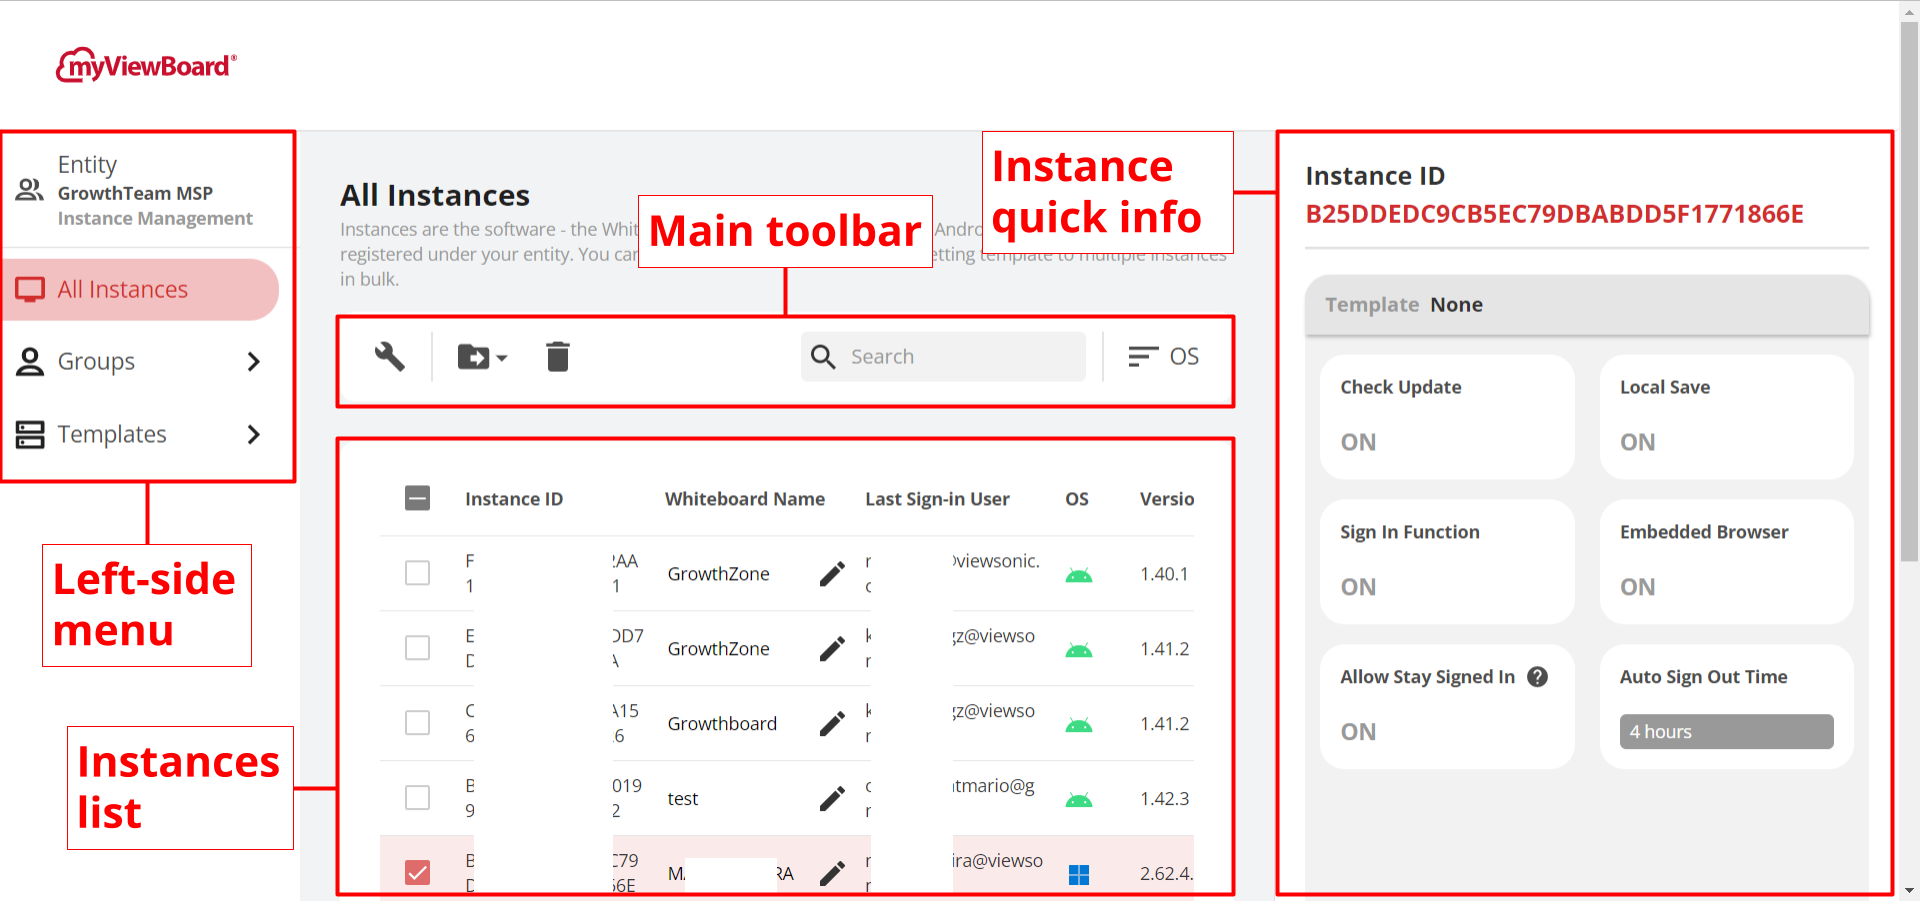 Primary sections of Software Instances console highlighted (left-to-right): Left-side menu, main toolbar, instances list, instance quick info panel.
Left-side menu
 Entity Entity
|
Identifies which entity's instances you are viewing. |
 All Instances All Instances
|
View all instances under this entity. |
 Groups Groups
|
View all instance groups that have been created under this entity. |
 Templates Templates
|
View all templates that have been created under this entity. |
Main toolbar
 Edit instance Edit instance
|
Update the specific configuration for selected instances. |
 Add to group Add to group
|
Move selected instances into an instance group. |
 Delete instance Delete instance
|
Remove instance enrollment from this entity. |
 Filter by OS Filter by OS
|
Filter instance list by OS. |
Instances list
| Checkboxes | When an instance row's box is checked, the main toolbar will fill with options. |
| Instance ID | Identifies a unique instance. Automatically generated when the instance is enrolled. |
| Whiteboard name | Whiteboard nickname given when the instance is enrolled. Can be edited by pressing  . . |
| Last sign-in user | The user that last signed in to this instance. |
| OS | Identifies the OS version of this instance. |
| Version | Identifies the version number of this instance. |
| IP Address | Identifies the IP Address last detected for this instance. |
| Template | Identifies the assigned template of this instance. Will appear empty if this instance does not have an assigned template. |
Instance quick view
This panel displays the current configurations for the currently selected instance. To view the quick info for a given instance, simply click the row of the desired instance. You know you will have selected an instance successfully because the panel should no longer be grayed out.
Editing these configurations can be done by selecting a desired instance and pressing 
Identifying an instance
When viewing your entity's list of instances, verify the instance with the Instance ID and Whiteboard Name.
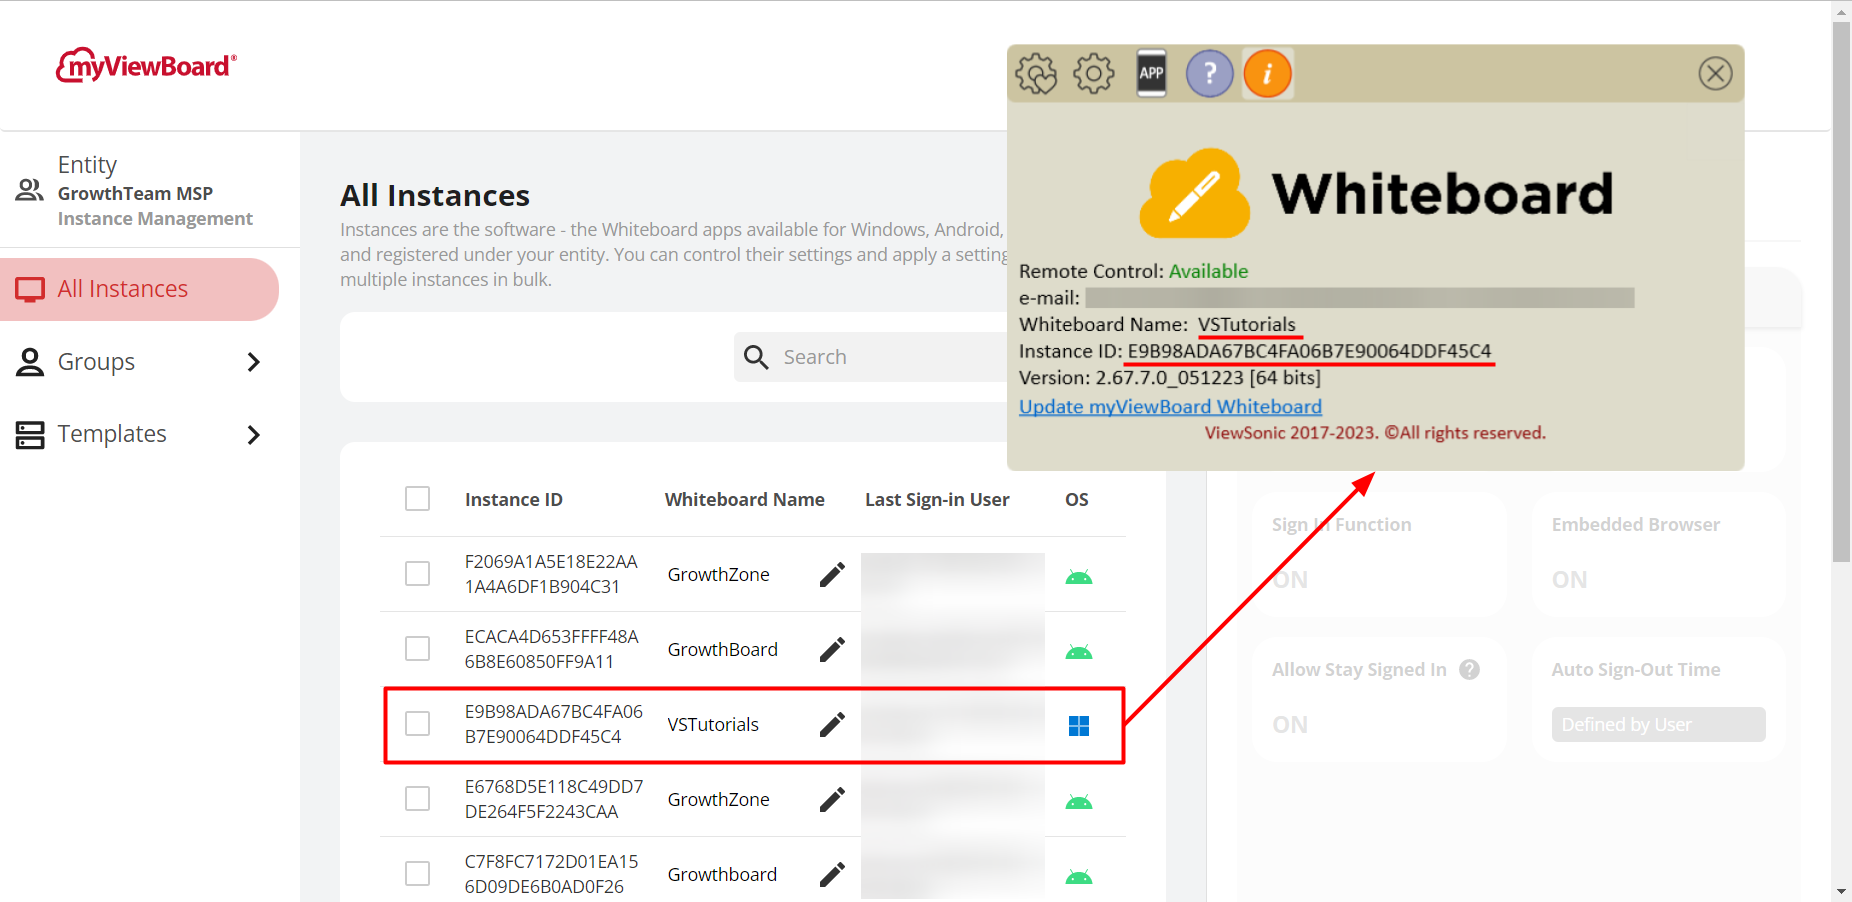 Windows settings pictured over Software Instances page with Whiteboard Name and Instance ID highlighted.
Configure an instance's settings
- On an instance list view, check the box for all desired instances.
- On the main toolbar, press
.
- Configure desired settings. (See breakdown below.)
- (Optional) Press + Save current settings as a template to save this configuration as a template for later use.
- When ready, press OK to update instance settings.
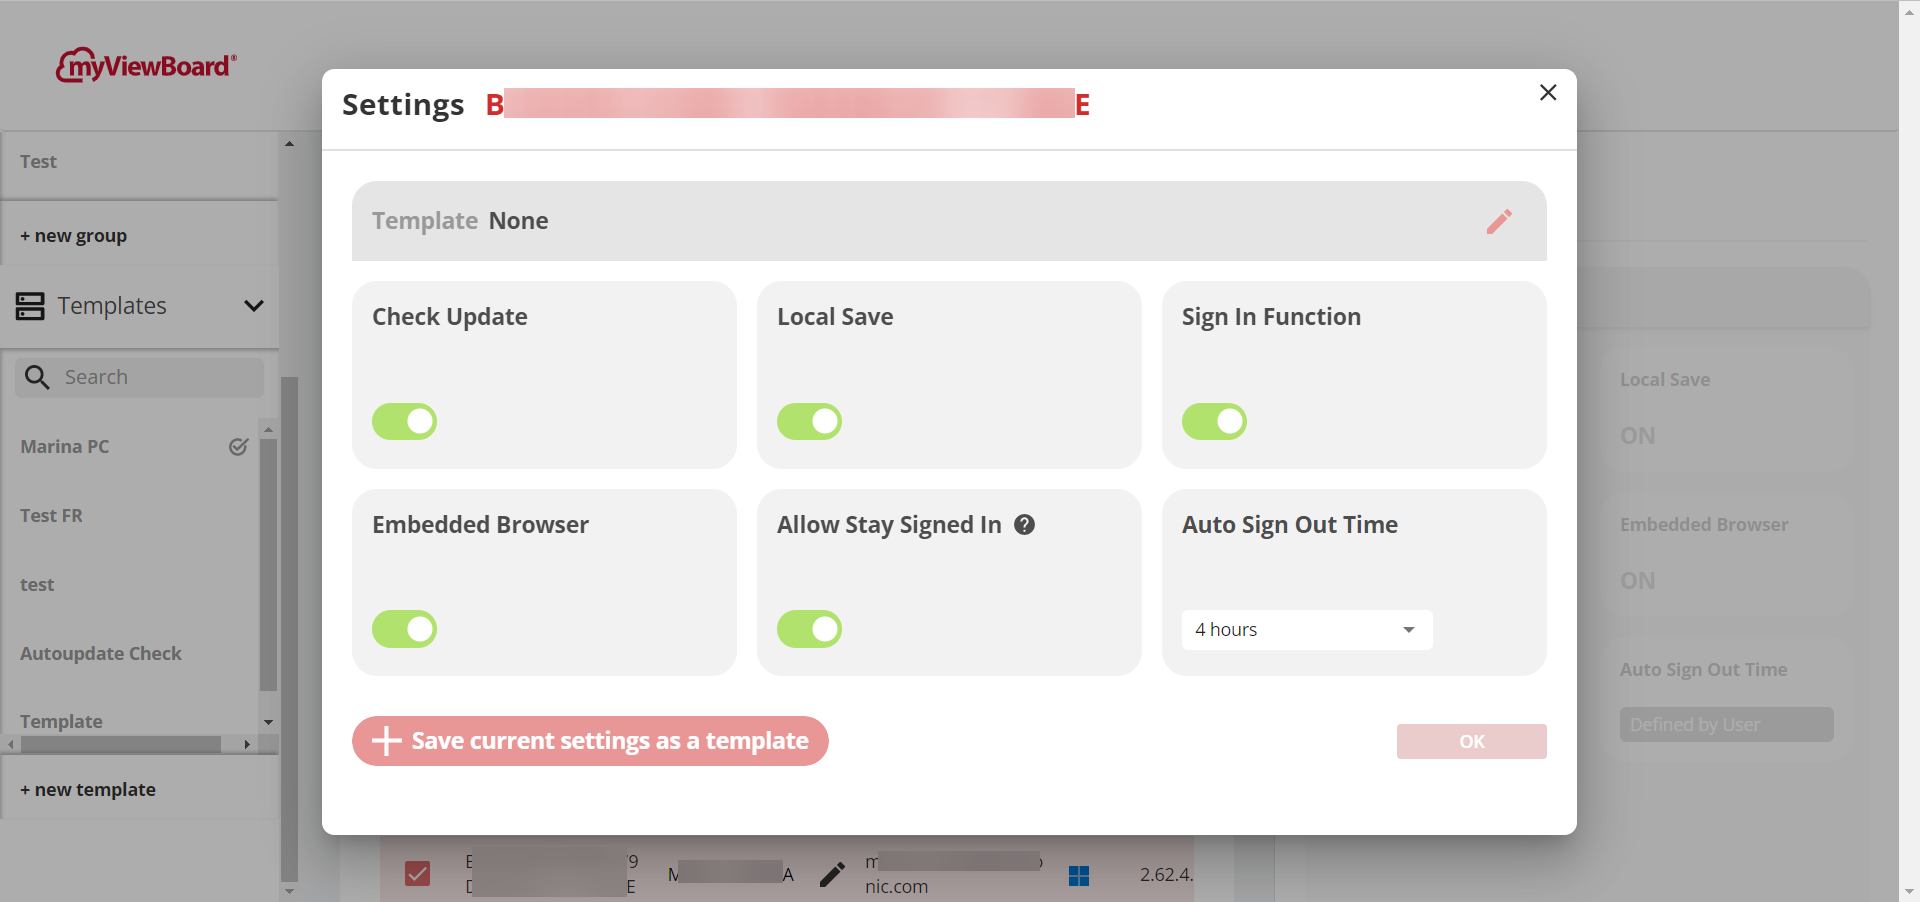 Settings pop-up within Software Instances.
Instance settings options
| Template | Identifies whether the instance you are viewing is configured following a template. Press  to select from previously created templates. to select from previously created templates. |
| Check for update | Sets whether users will automatically be notified of new versions of myViewBoard Whiteboard on launching the application. |
| Local save | Sets whether users are permitted to save to the local storage on the device where the instance is installed. |
| Sign in function | Sets whether this instance permits users to sign in or not. |
| Embedded Browser | Hides or makes available the Embedded Browser  within the main toolbar of myViewBoard Whiteboard. within the main toolbar of myViewBoard Whiteboard. |
| Allow stay signed in | Sets whether users will have the option to keep themselves signed in, even after closing the application. |
| Auto sign out time (Windows-only) | Sets a maximum duration, after which a user will automatically be signed out. Note: Allow stay signed in overrides this option. |
| Save current settings as a template | Press this button to save the current configuration as a template. The template will become available in the left-side menu, and it will be selectable in the Template section of this settings window. |
Templates
There are two general ways of applying a template to instances.
- On an instance list, select from a list of previously created templates by pressing
and then opening the dropdown menu:
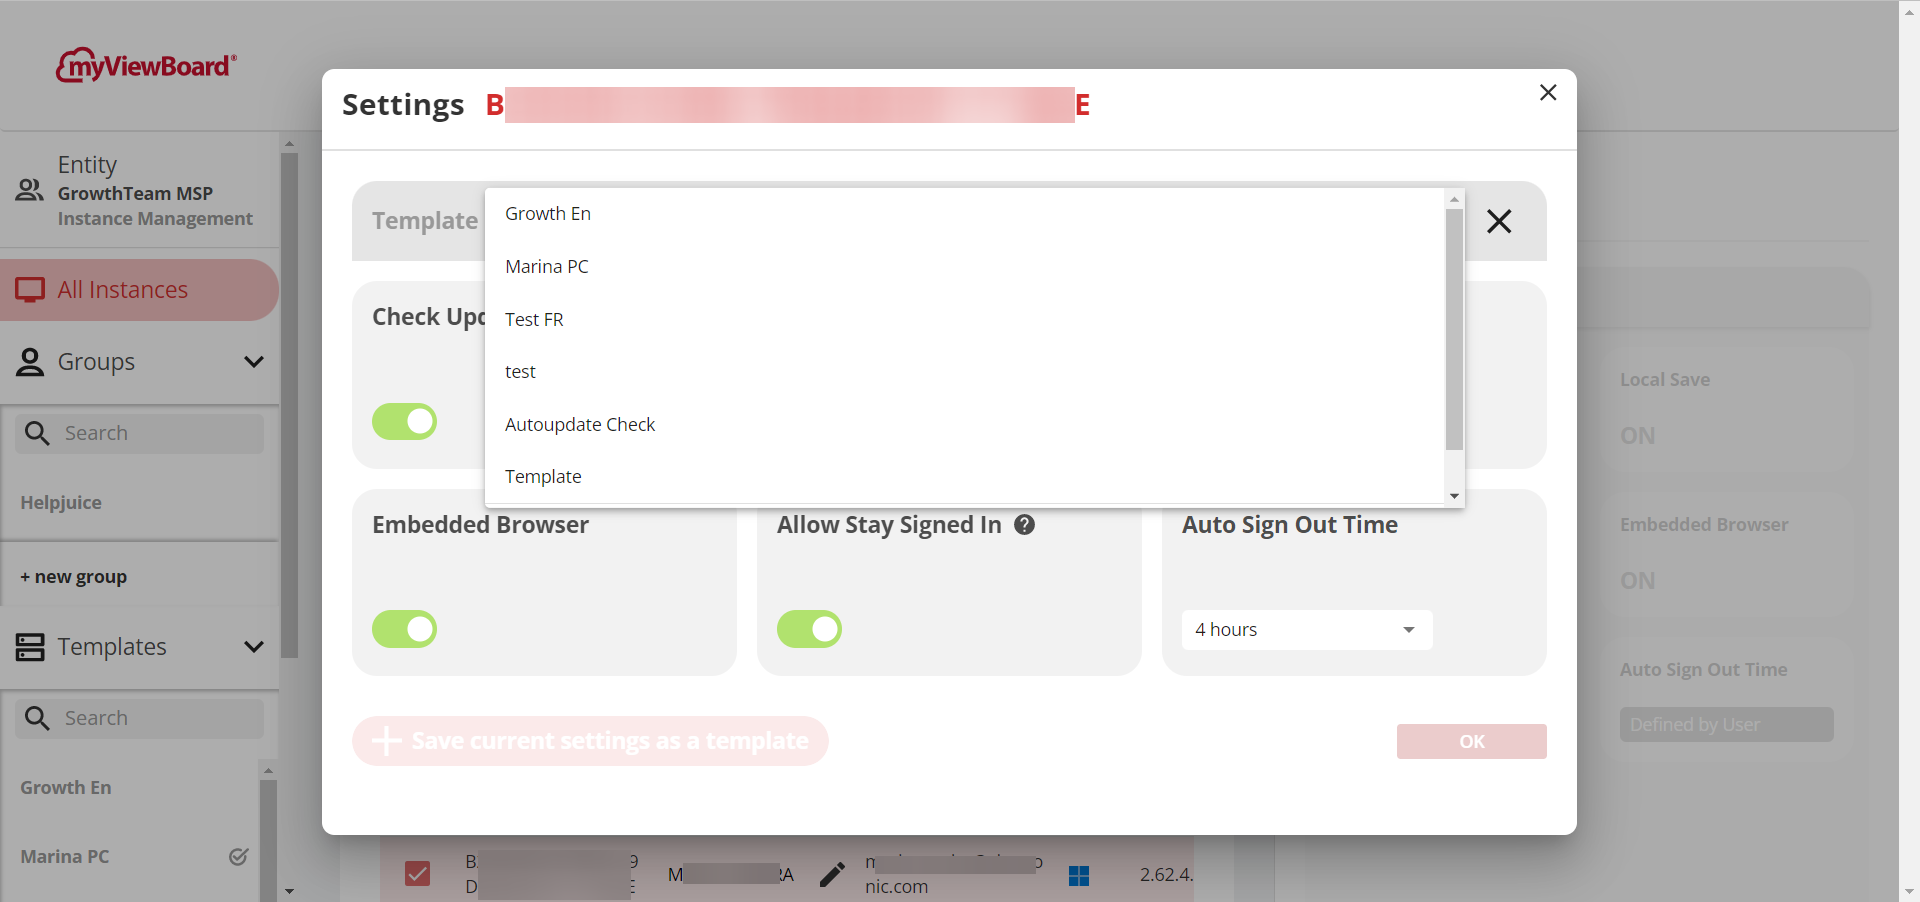 List of templates when configuring instance settings.
- On a template page, view devices currently applied with this template and have the option to add more:
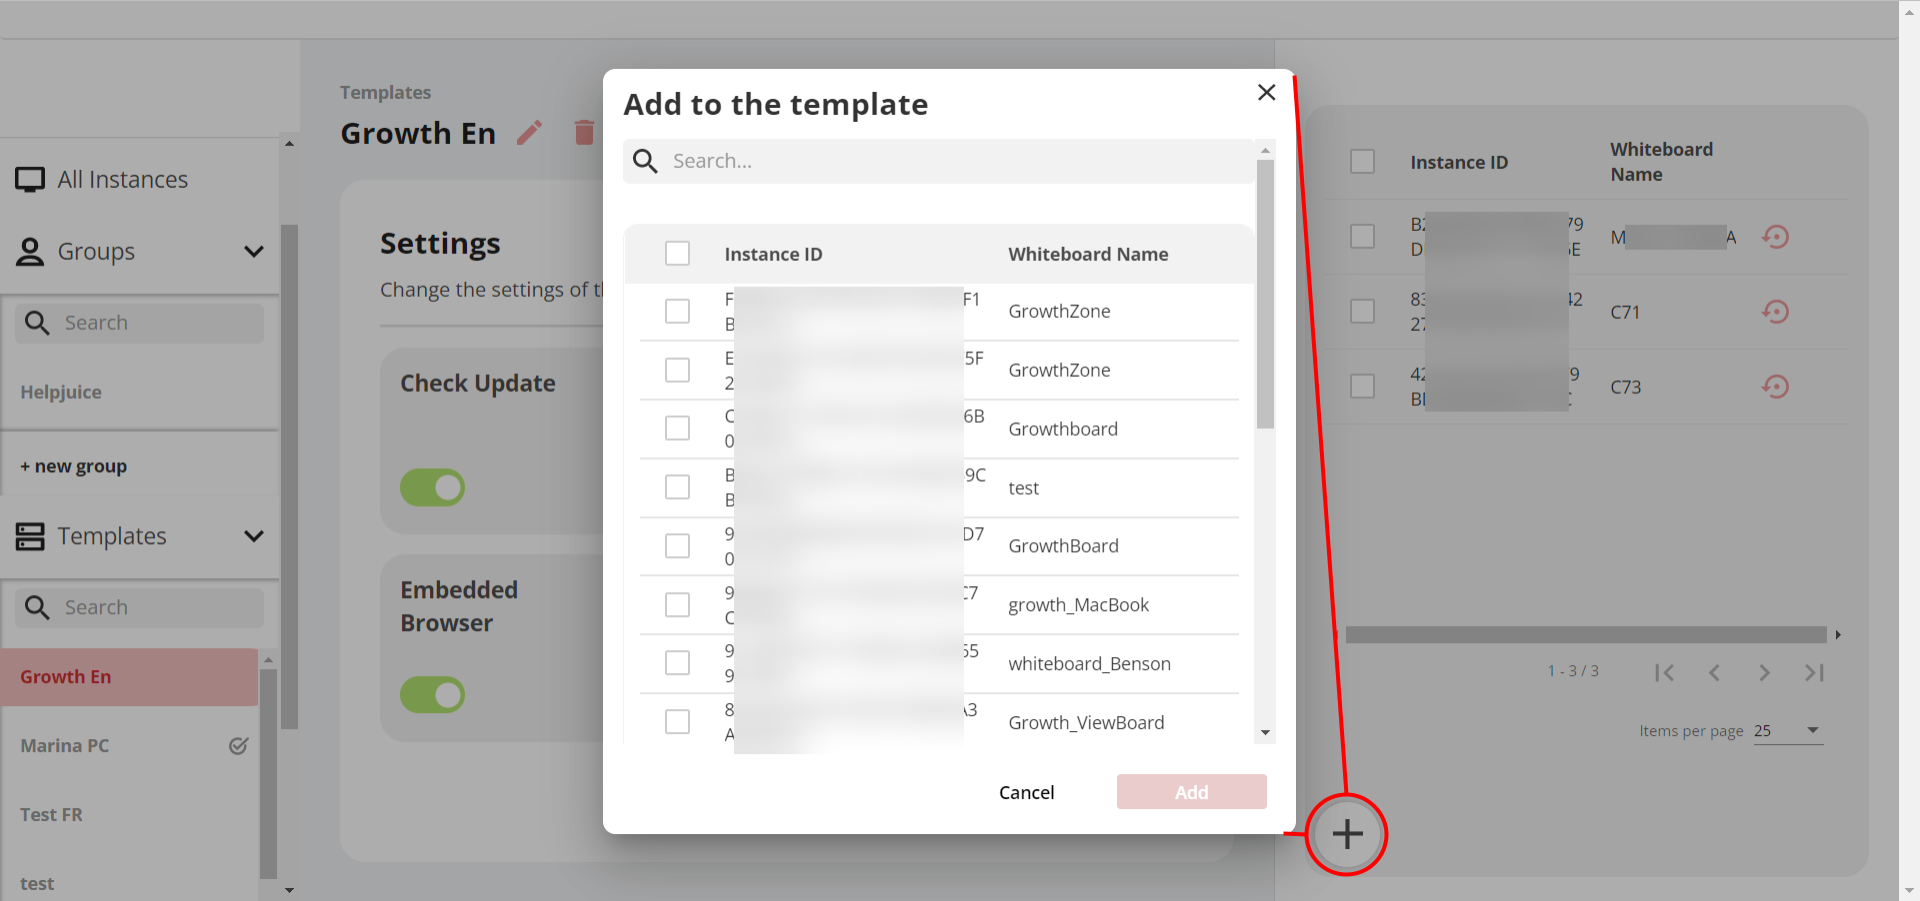 Template page with Apply template to devices pop-up open. List of devices is available to select from to apply the currently viewed template. Devices which are using this template are on the right-side panel.
Setting a default template
Additionally, any template created can be set as default. By doing so, any new instance added to your entity will be updated with this template's configuration. In this way, no action is required to change new instances' settings configurations unless you would like for those instances to follow a different configuration.
To set a template as default, simply press the Set as default button when on the page of your desired template.
The current default template will be indicated by 
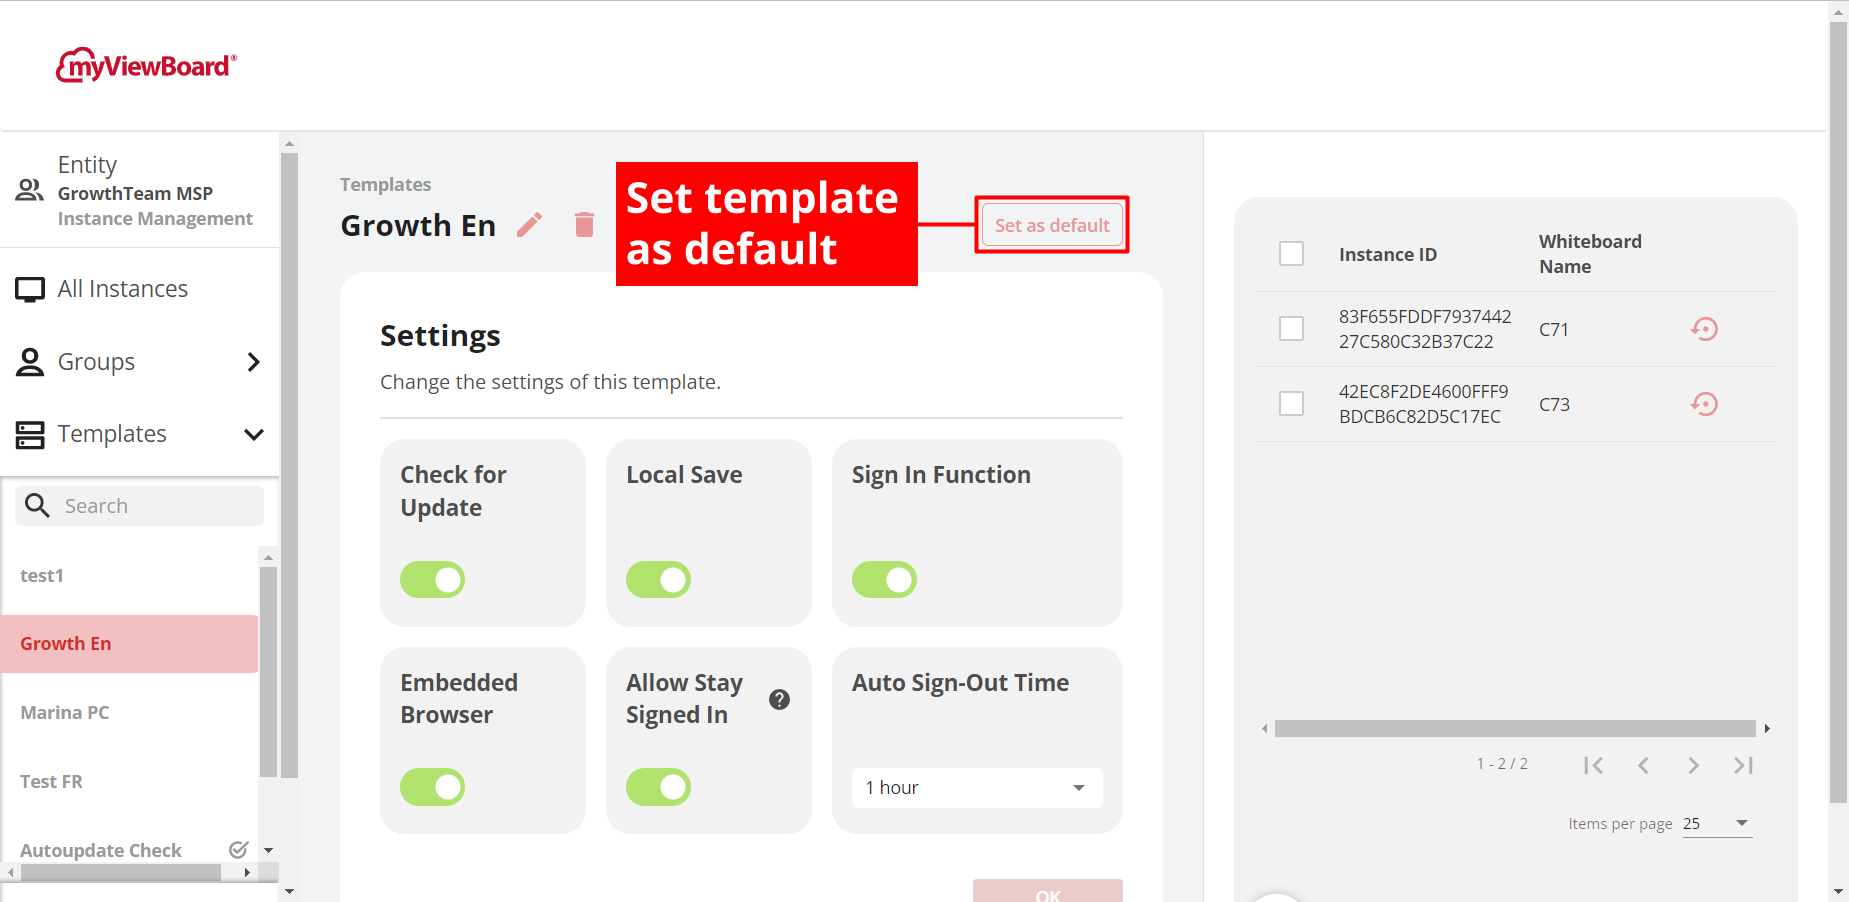 View of a template with the Set as default button highlighted.
Reset an instance to default
Additionally, you also have the ability to reset instances configured to a template's settings to the default template configuration.
To do so, go to the template with your desired instance(s). On the right-side panel displaying the list of instances configured to this template, press 
You also have the option to check the box for multiple instances and press the reset button that appears below.
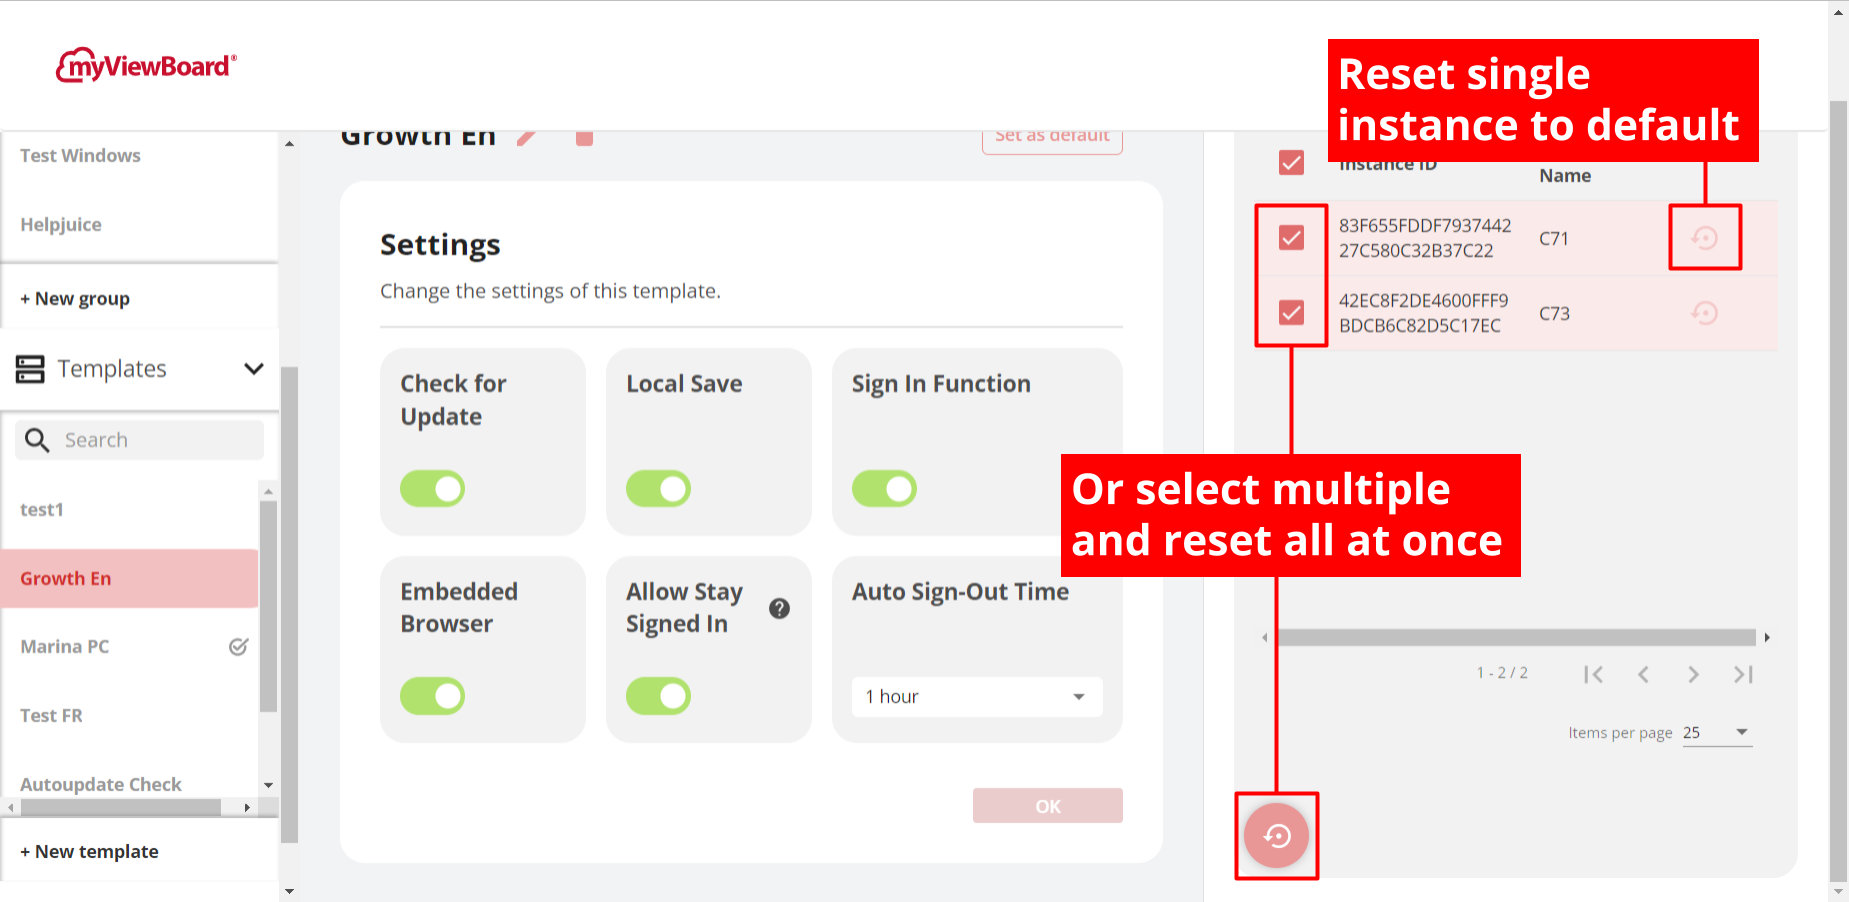 Instance list with options to reset a single instance or multiple instances highlighted.
Learn more
Contents
Give feedback
