 Accueil
-
Commencer avec ManagerGestion des AppareilsDiffusionManager Advanced
- Présentation de Manager Advanced
- Comment obtenir des licences Manager Advanced
- Assigner les licences Advanced
- Gestion des applications sur les appareils Advanced
- Télécharger et transférer des fichiers vers les appareils
- Chargement de médias et création de playlists
- Diffusion avancée
- Programmer le démarrage et de l'arrêt
- Sauvegarde et restauration
- Créer et assigner des Tâches
- Créer et assigner des Profils
- Contrôle à distance
- Mettre à jour le firmware depuis une source externe
- Statistiques
- Journal des actions
- Définir les autorisations et les rôles
- Installation et gestion des certificats
- Verrouillage des paramètres
- Standby mode
- Mode de démarrage
- Contrôler par groupe d'appareils
Autres
Ajouter des appareils sur Manager
Après avoir installé l'application Manager sur les appareils cibles, ajoutez-les à la console web du Manager en terminant le processus d'inscription. Une fois ajoutés, les administrateurs peuvent commencer à envoyer des commandes à ces appareils.
Quand aucun appareil n'est ajouté, Manager affiche l'écran tutoriel ci-dessous.

Prérequis pour les appareils
Avant de continuer, vérifiez que les appareils cibles répondent aux exigences suivantes :
- Allumé et connecté à Internet
- Accessible au sein du réseau
- L'application Manager pour Android est installée
Si vous avez besoin d'aide pour installer l'application Manager pour Android, consultez l'article suivant :
Ajouter via un code PIN à 6 chiffres
Utilisez un code PIN à 6 chiffres depuis l'appareil cible pour l'ajouter à Manager.
Sur l'appareil à inscrire, effectuez les étapes suivantes :
- Lancez la liste des applications de l'appareil.
- Localisez et appuyez sur la nouvelle application Manager.
Il se peut que vous ayez besoin d'agrandir la liste, en fonction de la version du lanceur. - Un nouveau message devrait apparaître.
Notez le code PIN à 6 chiffres dans la partie inférieure. - Appuyez n'importe où en dehors du message pour le fermer.
Si le message ne montre pas de code PIN à 6 chiffres, l'appareil a peut-être déjà été inscrit à une autre console Manager. Vous devrez peut-être désinscrire l'appareil de cette console Manager avant de recommencer.

De retour sur la console web du Manager, effectuez les opérations suivantes :
- Cliquez sur pour ouvrir l'écran Ajouter un appareil.
- Sur l'écran Ajouter un appareil , vérifiez que l'onglet Pin est sélectionné :
- Entrez le code PIN à 6 chiffres de l'appareil à inscrire.
- (Optionnel) Ajoutez un nom pour spécifier comment cet appareil apparaît dans la liste des appareils. Laissez ce champ vide pour utiliser le numéro de modèle comme nom de l'appareil.
- (Optionnel) Ajoutez l'appareil à un groupe.
- Cliquez sur OK.
- Le nouvel appareil devrait apparaître dans la liste des appareils du Manager.

Pour vérifier, revenez à l'appareil cible et effectuez les opérations suivantes :
- Lancez la liste des applications de l'appareil.
- Localisez et appuyez sur l'application Manager.
Il se peut que vous ayez besoin d'agrandir la liste, en fonction de la version du lanceur. - Le message Appariement réussi devrait apparaître.
- Appuyez sur Ignorer ou appuyez n'importe où en dehors du message pour le fermer.

Pour une explication complète, regardez la vidéo ci-dessous :
Ajouter via le numéro de série
Si l'application Manager n'est pas disponible, vous pouvez également inscrire l'appareil en utilisant le numéro de série de l'appareil.
Sur l'appareil à inscrire, localisez le numéro de série de l'appareil. Vous pouvez le faire de deux manières :
-
Vérification des paramètres.
Lancez l'application Paramètres de l'appareil et vérifiez le numéro de série signalé au système d'exploitation ViewBoard. L'accès aux Paramètres varie selon les appareils, mais il se trouve généralement dans le chemin suivant :-
Paramètres » Système » À propos de l'appareil » Numéro de série
-
Paramètres » Système » À propos de l'appareil » Numéro de série
-
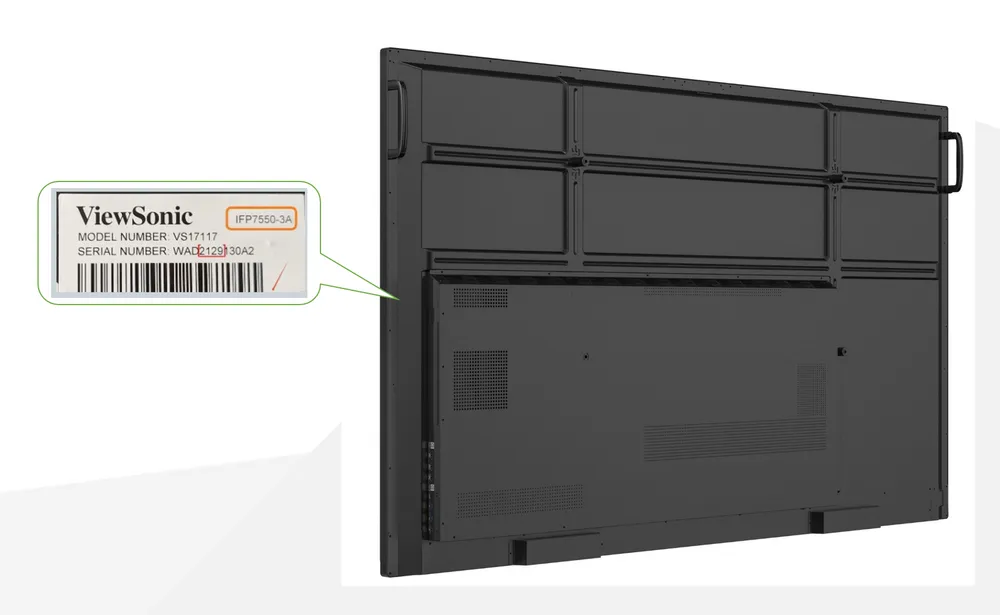
Inspection physique.
Inspectez l'appareil pour trouver une étiquette contenant le numéro de série de l'appareil. L'étiquette du numéro de série se trouve généralement sur le côté droit de l'appareil.
De retour sur la console web du Manager, effectuez les opérations suivantes :
- Cliquez sur pour ouvrir l'écran Ajouter un appareil.
- Sur l'écran Ajouter un appareil, vérifiez que l'onglet Numéro de série est sélectionné :
- Entrez le numéro de série de l'appareil à inscrire.
- (Optionnel) Ajoutez un nom pour spécifier comment cet appareil apparaît dans la liste des appareils. Laissez ce champ vide pour utiliser le numéro de modèle comme nom de l'appareil.
- (Optionnel) Ajoutez l'appareil à un groupe.
- Cliquez sur OK.
- Le nouvel appareil devrait apparaître dans la liste des appareils du Manager.

Ajouter via l'application Companion
Si vous l'avez déjà installée sur votre smartphone, vous pouvez également utiliser l'application myViewBoard Companion pour inscrire un appareil.
Sur l'appareil à inscrire, effectuez les opérations suivantes :
- Lancez la liste des applications de l'appareil.
- Localisez et appuyez sur la nouvelle application Manager.
Il se peut que vous ayez besoin d'agrandir la liste, en fonction de la version du lanceur. - Un nouveau message devrait apparaître.
Notez le code QR dans la partie inférieure. - Ne fermez pas le message jusqu'à ce que le processus d'inscription soit terminé.
Sur votre smartphone, lancez l'application myViewBoard Companion et effectuez les opérations suivantes.
- Connectez-vous avec un compte administrateur d'entité. Si vous gérez plusieurs entités, connectez-vous à l'entité où vous souhaitez inscrire l'appareil.
- Appuyez sur le lecteur de code QR et scannez le code QR affiché sur l'appareil.
- Sur la page suivante :
- Vérifiez que l'entité correcte est sélectionnée.
- Ajoutez des informations supplémentaires sur l'appareil si nécessaire.
- Appuyez sur Soumettre pour ajouter l'appareil au Manager.
- Pour vérifier que l'inscription a réussi, connectez-vous au Manager et vérifiez que l'appareil est maintenant répertorié dans la liste des appareils.
Ajouter via l'importation de fichier
Si vous avez plusieurs appareils à ajouter, vous pouvez effectuer une importation en masse en utilisant un fichier Excel xlsx. Manager fournit un fichier modèle que vous pouvez facilement mettre à jour avec les détails de vos appareils cibles.
Pour télécharger le fichier modèle, effectuez les opérations suivantes :
- Cliquez sur la console web du Manager.
- Sur l'écran Ajouter un appareil :
- Cliquez sur l'icône à côté du bouton Importer la liste des appareils .
- Cliquez sur le lien Télécharger le fichier modèle dans l'info-bulle.
Attendez que le téléchargement du fichier modèle soit terminé.
- Naviguez jusqu'à l'endroit où vous avez téléchargé le fichier modèle.
- Double-cliquez sur le fichier modèle pour l'ouvrir.

Pour modifier le fichier :
Utilisez une application qui peut éditer les fichiers xlsx. Nous recommandons vivement Microsoft Excel, mais n'importe quel programme de tableur qui peut enregistrer des fichiers xlsx conviendra.
Sur chaque ligne, remplissez les informations suivantes pour chaque appareil que vous souhaitez ajouter :
| Colonne | Description |
|---|---|
| PIN | Code PIN à 6 chiffres de l'application Manager installée sur l'appareil |
| Nom de l'appareil | Nom unique que le Manager utilise pour identifier l'appareil |
| Étiquette d'actif | ID interne utilisé pour la gestion de l'inventaire |
| Notes | Autres détails qui décrivent l'appareil |
| Nom du groupe * | Nom du groupe où l'appareil est ajouté après l'inscription |
| Groupe parent * | Nom du groupe parent si le groupe est imbriqué |
* Notez les règles suivantes pour les groupes :
Pour le nom du groupe :
- Le nom du groupe ne doit pas dépasser 64 caractères.
- Si aucun groupe existant ne correspond au nom donné, Manager crée un nouveau groupe.
- Pour spécifier plusieurs groupes pour un appareil, utilisez une virgule entre chaque groupe.
Par exemple : GroupeA, GroupeB, GroupeC
Pour le groupe parent et les sous-groupes :
- Pour ajouter un appareil à un sous-groupe, spécifiez le groupe parent dans "Groupe parent".
Par exemple :
Nom du groupe colonne : Groupe 1
Groupe parent colonne : Parent A
Cet appareil sera ajouté à Parent A => Groupe 1 - Utilisez => pour définir la relation entre le groupe parent et le sous-groupe.
Par exemple :- ParentA=>SousGroupeA
- Si aucun groupe parent n'est défini, l'appareil est ajouté au groupe situé à la racine.
- Alors qu'un appareil peut avoir plusieurs groupes, il ne peut avoir qu'un seul "Groupe parent".
- Les sous-groupes peuvent être imbriqués jusqu'à 3 niveaux de profondeur.

Une fois que le fichier modèle est rempli et prêt, effectuez les opérations suivantes :
- Cliquez sur la console web du Manager.
- Sur l'écran Ajouter un appareil :
- Cliquez sur le bouton Importer la liste des appareils.
- Dans la boîte de dialogue Ouvrir le fichier, sélectionnez le fichier modèle complété. Une fois que le contenu du fichier est lu, la boîte de dialogue Ajouter un appareil apparaît.
- Sur la boîte de dialogue Ajouter un appareil, vérifiez si toutes les entrées ont été correctement lues. Notez que vous pouvez toujours modifier le contenu ici avant d'importer.
- Cliquez sur OK si tout semble correct.
- Vérifiez la liste des appareils pour confirmer que toutes les entrées ont été importées.

Supprimer un appareil
Utilisez la console du Manager pour supprimer l'appareil si :
- Vous avez accidentellement ajouté l'appareil à une entité incorrecte.
- Vous devez déplacer l'appareil vers un autre compte.
- L'appareil cible a été retiré et n'est plus dans le réseau.
Après la suppression, Manager retire l'appareil de la liste des appareils et vous ne pourrez plus envoyer de commandes à l'appareil. Pour supprimer un appareil, effectuez les opérations suivantes :
- Cliquez sur le menu pour ouvrir le panneau latéral.
- Cliquez sur l'option Appareils .
- Cliquez sur l'onglet Tous les appareils.
- Sur la liste des appareils, cliquez sur la case à cocher des appareils que vous souhaitez supprimer.
Cliquez sur l'icône de recherche pour trouver plus facilement vos appareils cibles. - Cliquez sur l'icône de suppression sur la barre d'outils située au-dessus de la liste des appareils.
- Le Manager vous demandera de confirmer l'action.
Cliquez sur OK. - Les appareils sélectionnés devraient disparaître de la liste des appareils.
