Home
-
Getting started with ManagerManaging devicesBroadcastingManager Advanced
- Manager Advanced overview
- How to get Advanced licenses
- Assign licenses
- Manage apps on Advanced devices
- Upload files and transfer to devices
- Create playlists
- Advanced broadcasting
- Startup and shutdown scheduling
- Back Up and Restore with Advanced
- Settings Lock
- Create, assign and schedule Jobs
- Create and assign Profiles
- Remote Desktop
- Update firmware from external source
- Install and manage certificates
- Reports
- Action Log
- > More
Other Manager info
Install and manage certificates
Install certificates across required devices from the Manager console, allowing for remote set up of digital security support across an organization.
Supported certificate file formats
| Standard certificates | PEM, CER, CRT, DER, P7B, JKS |
| Encoded certificates | P12, PFX |
CERTIFICATE MANAGEMENT DEVICE SUPPORT
This feature is only available for select devices. Check device support information in our device capability chart.
Install a certificate
Install a certificate onto selected devices from a device list or from a given device's Device Info view.
ONLY 1 CERTIFICATE INSTALLATION PERMITTED AT A TIME
Whether installing from a device list or a Device Info view, only 1 certificate installation is permitted at a time. Attempting to install more than one certificate will result in an error.
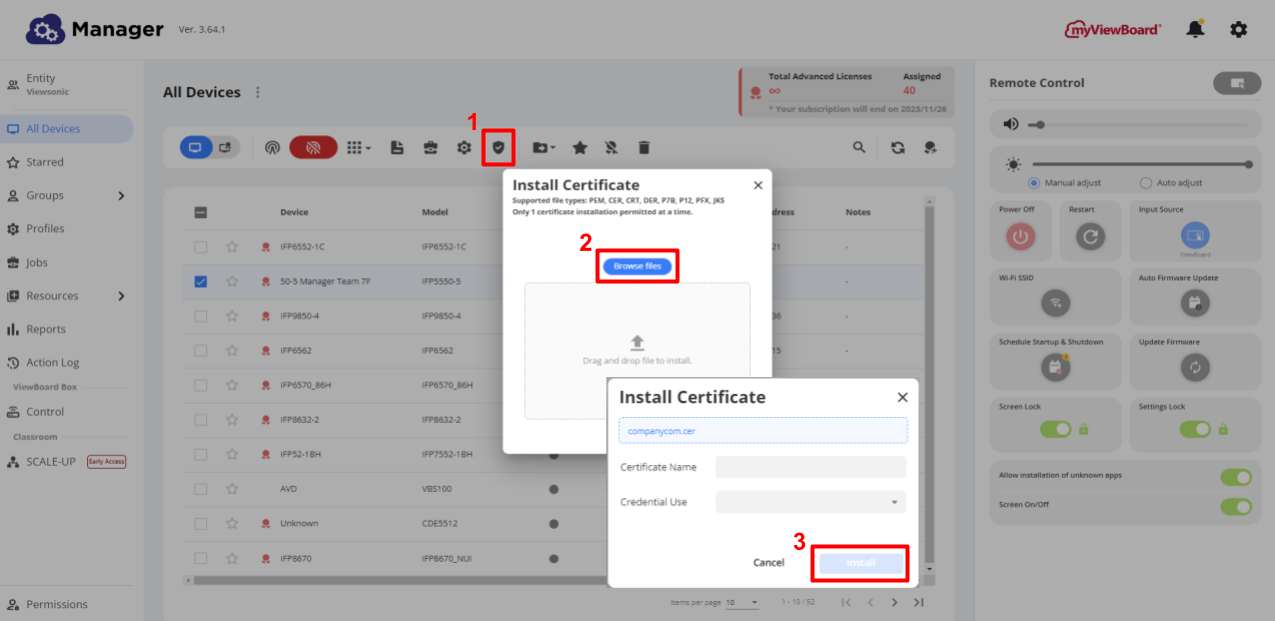
From the All Devices panel
- Go to the
All Devices panel.
- Select the Advanced devices on which you want to install a certificate.
- Press the certificate button
on the main toolbar.
- Drag and drop the installation file into the prompt or browse for it.
- Input a Certificate Name.
- Select a Credential Use:
- VPN and apps: Used for authentication and secure communication between apps and VPN servers. This ensures data transmitted between a device and server are protected from unauthorized access.
- Wi-Fi: Used for authentication when connecting to Wi-Fi networks. This ensures a connection is encrypted and protected from unauthorized access.
- Press Install.
 Install Certificate dialog opened from a device list.
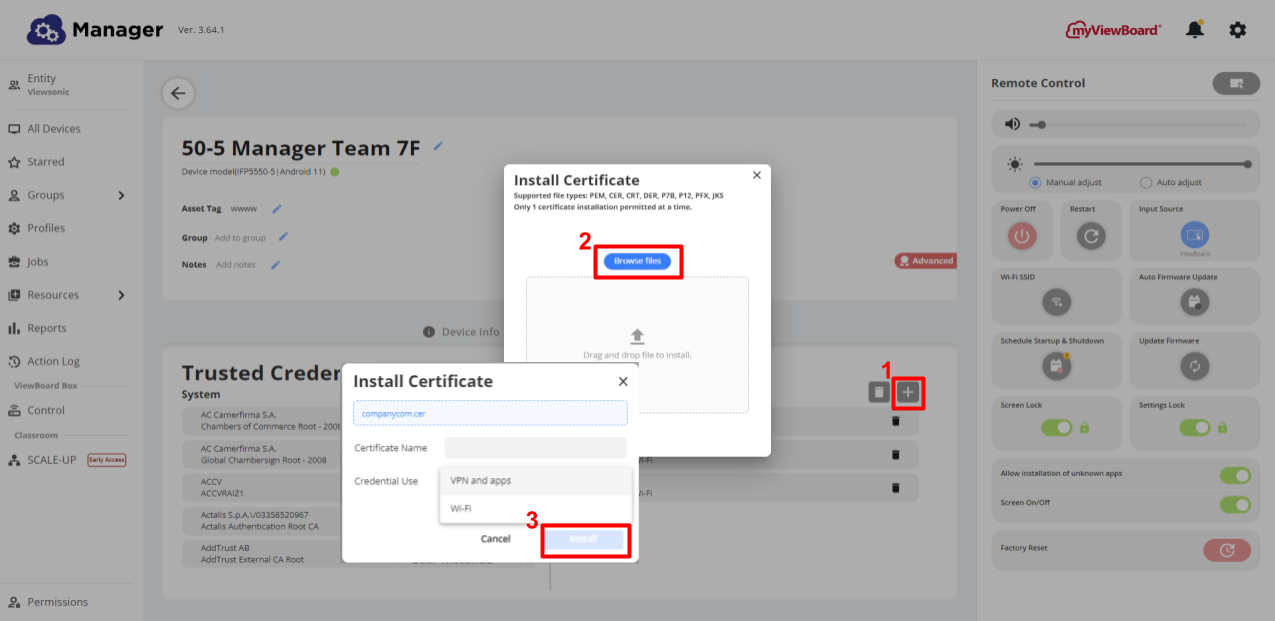
From the Device Info view
- Go to the
All Devices panel.
- Double press an Advanced device to open its Device Info page.
- Switch to the Certificates tab.
- In the User Installed section, press
.
- Drag and drop or browse the certificate to install.
- Input a Certificate Name.
- Select a Credential Use (see above for use breakdown).
- Press Install.
 Install Certificate dialog from the Device info view for a select device.
PASSWORD PROTECTED CERTIFICATES
Some certificates, such as .p12 and .pfx file formatted certificates, can require a password (provided by the certificate provider) to proceed with installation.
Disable or uninstall a certificate
User installed certificates (whether on the device itself or through Manager) can be deleted. However, preinstalled certificates can only be disabled. Learn how to manage certificates below.
- Go to the
All Devices panel.
- Double press an Advanced device to open its Device Info page.
- Switch to the Certificates tab.
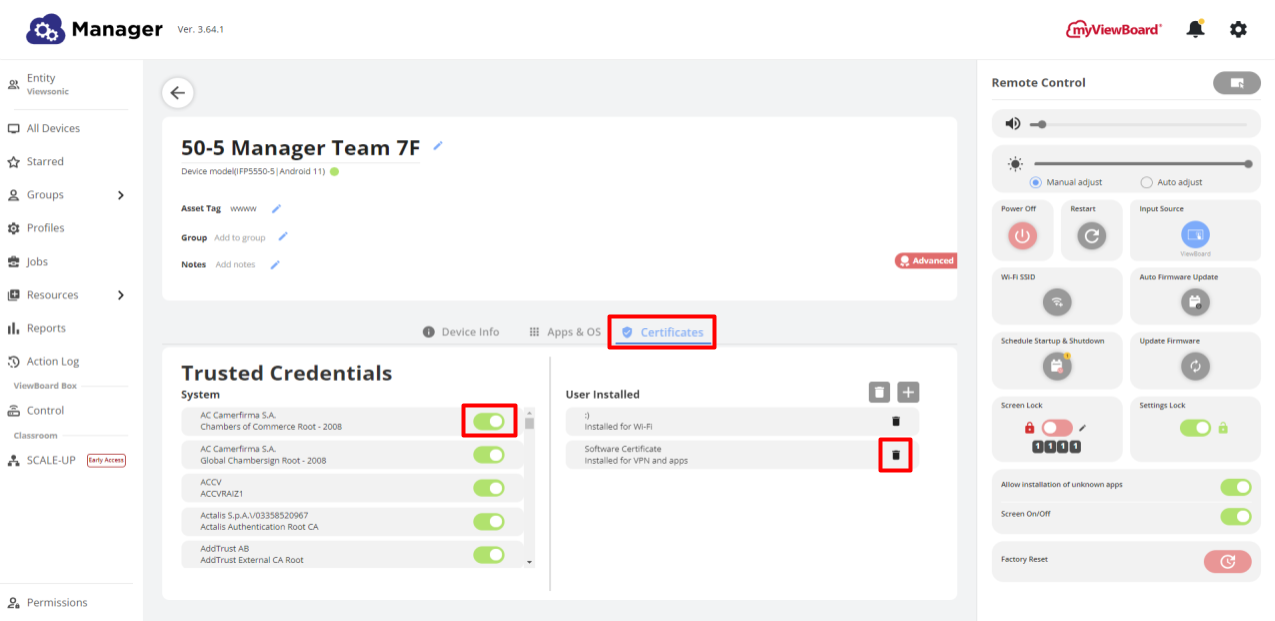
To disable a preinstalled certificate,
- In the Trusted Credentials section, locate your desired certificate.
- Disable a certificate by toggling it off
.
To delete the certificate,
- In the User Installed section, locate your desired certificate.
- Press
next to this certificate.
- Press OK to confirm the deletion.
 Disabling preloaded certificates (left) and deleting user installed certificates (right) options highlighted in a device's Device Info Page.
WI-FI CERTIFICATES CAN ONLY BE BATCH DELETED
Wi-Fi certificates installed on a device can't be individually deleted from the Manager console. Users can either individually delete Wi-Fi certificates from a device's System > Security settings, or if they wish to delete from the Manager console, the only available option is to remove all certificates by pressing 
PREINSTALLED CERTIFICATES CAN'T BE DELETED
Preinstalled certificates (located in the Trusted Credentials section in a device's Device info page) can't be deleted.

