Screen Capture full breakdown
The Screen Capture  tool allows a host to take a screenshot, record the screen, record audio, and live stream the screen. Screen Capture features vary depending on myViewBoard version.
Taking a screenshot
Screenshot options
Windows
 Capture the entire screen Capture the entire screen
|
Capture the entire canvas area. |
 Capture a freehand region Capture a freehand region
|
Draw the area to capture. Make sure to close the shape or the screenshot will not capture. |
 Capture a rectangular region Capture a rectangular region
|
Tap and drag to draw a rectangle over the area to capture. Release to capture. |
Android
|
Capture the entire screen
|
Capture the entire canvas area. |
|
Capture a rectangular region
|
Click and drag to draw a rectangle over the area to capture. Release to capture. |
iOS
|
Capture the entire screen
|
Capture the entire canvas area. |
|
Capture a rectangular region
|
Click and drag to draw a rectangle over the area to capture. Release to capture. |
To take a screenshot, perform the following steps:
- Press Screen Capture .
- Select a screenshot option.
- After the capture, the image is added onto the canvas as a new object.
- Interact with the image as with any other object.
Users that are currently signed in have the option to save the screenshot to their cloud storage:
- Click the image once.
- Click the Save as…
 icon from the menu.
 - Navigate to the desired location, and click the check icon.
Record the screen
To record the screen, perform the following steps:
Windows
- Press Screen Capture to open your screen capture options.
- Press the Video Recorder
 icon.
icon. - Set up your recording environment:
-
 Volume slider: Set the recording volume of the session.
 -
Screen record: Record the whole screen.
-
 Selection record: Specify a freehand region to record.
-
- Press Record
 .
.- If a freehand region was specified, red lines will appear along the edges of the screen. Drag corners of the region to resize the recording area. Press the record button once ready.
- If you select to record the entire screen, select a video resolution, and then press the checkmark to get started.
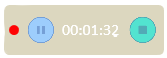
- During recording, a floating bar provides the option to pause/resume the screen recording or stop it at any time.

- Press Stop
 to end the recording.
 - Once pressed, review the video using the preview window.
- Click the save disk icon and select a location to save the video. You can only save videos to a local hard drive (not cloud storage).
Android
In myViewBoard for Android, the Video Recorder feature of the Screen Recorder tool is natively replaced by the myViewBoard Record  app. Learn more about myViewBoard Record.
Live streaming
To livestream the screen online, perform the following steps:
Windows
- Press Screen Capture .
- Press Video Recorder .
- Press the Stream
 icon.
icon. - Provide the following:
- Stream Key: Sign in to your streaming service to find your unique streaming key.
- Stream URL: The stream URL for your platform.
- (Optional) Select the Record the stream checkbox to record a copy of the stream to your local drive.
- Press
 after selecting your desired video resolution.
 - Press
 to start the stream.
To learn more about live-streaming, visit the Live-streaming page.
DeleteAndroid
myViewBoard Live  is an Android app for live-streaming to Facebook, YouTube, Twitch, and Workplace.
Live is preinstalled on ViewSonic IFP devices, and already available in myViewBoard for Android to stream your presentation sessions.
To learn more about myViewBoard Live.
DeleteRecord audio
Windows
DeleteRecording an audio file
To record an audio file, perform the following steps:
- Press Screen Capture .
- Press the Audio recorder
 icon.
icon. - During recording, a floating bar provides the option to pause/resume the audio recording or stop it at any time.
- Press Stop to end the recording.
- Once pressed, review the audio using the preview window.
- Press the save disk icon and select a location to save the file. Files will be saved as an MP3 file.