Permisos
Como administrador de una entidad, administre las acciones que otros usuarios administradores pueden realizar dentro de myViewBoard Manager. Dirígete a la página de Permiso de Administrador 
Se recomienda a los usuarios administradores que recién comienzan a configurar su organización, evalúen a todos los usuarios administradores dentro de la organización antes de otorgarles acceso a la consola de Manager. De esta forma, pueden limitar y asignar ciertos dispositivos a los usuarios administradores de la organización, así como también las acciones privilegiadas a tener, como ser el Escritorio Remoto o Asignación de Perfiles, que son de uso avanzado.
Descripción general de los permisos configurables
Lista: permisos de usuario configurables
| Permiso | Detalles |
|---|---|
| Inscripción y desactivación de dispositivos |
|
| Gestión de grupos de dispositivos |
|
| Gestión de aplicaciones |
|
| Gestión de multimedia |
|
| Gestión de archivos |
|
| Gestión de informes de uso |
|
| Comandos básicos de control remoto |
|
| Comandos avanzados de control remoto |
|
| Control de dispositivo ViewBoard Box |
|
Gestión de tareas |
|
| Privilegios de administrador |
|
| Escritorio remoto |
|
| Gestión de Perfiles |
|
| Gestión de Respaldo y Restauración |
|
Cómo editar permisos de usuario
- Dirígete a la página de Permisos
.
- Presiona Editar
 en la fila del usuario deseado.
 - Se abrirá la ventana emergente Editar permisos.
- Selecciona la casilla de los permisos que desea otorgar o denegar para ese usuario determinado.
- (Opcional) Vea qué comandos específicos se otorgan/deniegan dentro de una categoría presionando
.
- (Opcional) Vea qué comandos específicos se otorgan/deniegan dentro de una categoría presionando
- Pulse el botón OK para actualizar los permisos del usuario seleccionado.
- Después de que los permisos han sido actualizados, presiona la fila del usuario (o cualquier otro usuario) para tomar nota de los permisos actuales.
 El usuario establece permisos para un usuario de Manager.
Grupos de dispositivos y permisos de carpetas
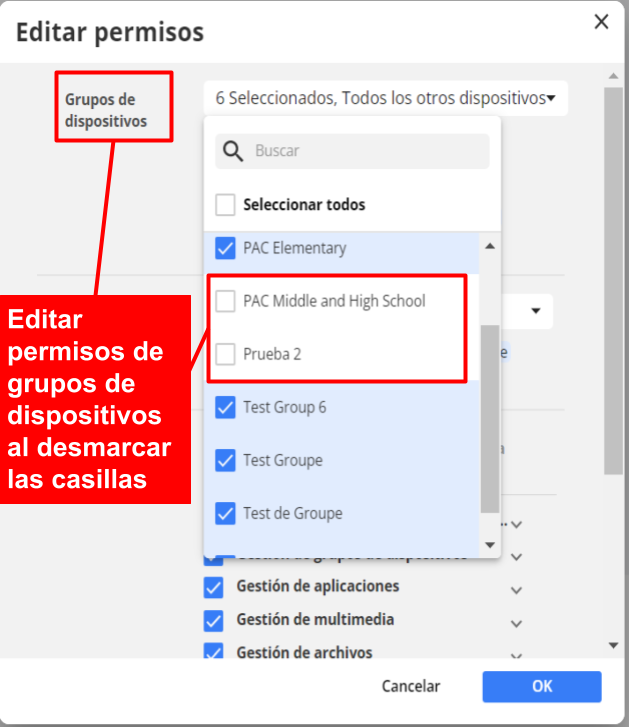
Permisos pueden ser establecidos para grupos de dispositivos y carpetas específicas para que los usuarios no sean capaces de verlos o accederlos. Los pasos para establecer permisos para grupos de dispositivos y carpetas son casi iguales a como establecer otros permisos.
 Ventana emergente de Editar Permisos con Grupos de dispositivos resaltado. El usuario ha desmarcado 2 grupos para un usuario. Después de guardar estos cambios, el usuario ya no tendrá acceso a estos grupos
.png) Ventana emergente de Editar Permisos con Carpetas resaltado. El usuario ha desmarcado 2 carpetas para un usuario especifico. Después de guardar estos cambios, el usuario ya no tendrá acceso a estas carpetas.
Ventana emergente de Editar Permisos con Carpetas resaltado. El usuario ha desmarcado 2 carpetas para un usuario especifico. Después de guardar estos cambios, el usuario ya no tendrá acceso a estas carpetas.

 Inicio